Making Prop Molds
There are a couple of sites on how to build prop molds and this is just another but, I will outline my way based on twentyfive of experience.
The first rule is don't introduce any foreign matter into the mold such as metal and wood, they have different expansion rates and only cause distortion.
Select the prop you want to reproduce, glass or carbon is best but, you can use wood. Start by cleaning it up, make sure the hubs are flat and parallel and the blades are of equal thickness and form. Knife edge that T.E. and get the L.E. the way you want the finished part to be.

Probably the hardest part is preparing the hub for the parting line. This is where the mold forms around the hub and splits it. It must have the proper draft ( 2 degrees min. ) so the prop comes out after molding. The picture above shows the part line carved into the prop if you have enough hub or, you can build it up with epoxy and feather it in. As long as you get a smooth flow from the leading edge to the trailing edge. I prefer this method versus a more vertical line as seen on others. Once your satisfied with the ' plug ' put a finish on it remember, the mold is only as good as the plug so any defect in the plug will show in the mold.
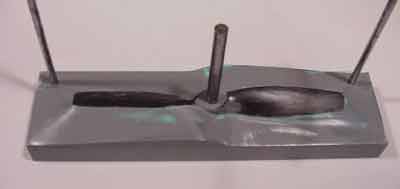
To the right are the plates for the mold bases and sides of the box. The mold base for prop up to 9" are 1 1/2" wide and the length of the prop, plus 2". For larger props I use a base of 2 1/4" wide like the one in the picture that looks as if there were a prop in it. The box plates are 2 1/2" tall and the ends are the same width as the mold bases. You can use finished hardwood instead of aluminum as I do.
For this prop I will use the base in the lower left hand corner of the picture, a small one for a 1/2A prop. The base has already been drilled to accept the shaft pin and alignment pins which are 1/8". Note the pin holes are on the same side to avoid confusion when closing the mold.

For the shaft pins I use either gage pins or drill blanks. Wax the plug and pin with ' Partall ' paste #2, let dry and polish out.( NOTE: do not substitute any other wax, most have silicones which will cause the PVA to bead up ) Take the shaft pin and install on plug from the front and push through so about 1/4" is exposed out the back, toward the engine. Brush or spray two coats of PVA, let dry between coats. The paste helps the PVA flow out for a better finish. When dry, mount on base plate with the front of the blades outward.
To build up the area under the plug and establish a flowing surface from the LE and TE to the edges of the mold base, I use Bondo instead of clay as in other methods. Clay has either water or oil as a base and can contaminate the mold material and cause an incomplete cure. If a little hardner is used it will give you enough time to carve the Bondo to shape. For ease, I make some ' cake decorators ' bags from paper and tape. Roll the paper to a funnel shape and seal with tape, cut the point for letting the Bondo flow out at a controlled rate.
Mix some Bondo up and put into funnel, tape the top up (you want it to come out the other end) squeeze the Bondo under the blades and start building up slowly but only to the LE and TE as shown in picture below, to the left, do not go into the hub area. Trim with a Xacto blade as shown in the center picture. Trim a thin piece of aluminum so it blends around the part line in the hub and tape down as shown to the right.


Mix up some more Bondo and squeeze under the aluminum plate and build up as shown below. Trim the excess with a knife. Repeat for the other blade. While still soft, touch up with some 100 grit and 320. Don't worry if you take off the PVA, it was only important to keep the bottom of the prop from sticking to the Bondo.
Carefully remove the shaft pin, spray on some auto primer and use some glazing putty to take care of the flaws or until your satisfied. Just make sure you can view a clean prop outline with nothing over the top of the blades such as Bondo and paint, that could prevent you from removing the mold base after the top of the mold has been poured. Remember to clear the alignment pins holes if blocked.
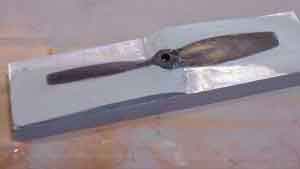


To the right is the plug finished, waxed and ready for PVA. I typicaly sand to 320 grit and then add wax, it may not seem fine enough for some but, the PVA layed on produces the final finish. Shaft pin and alignment pins, waxed, are installed before PVA, make sure the sides are waxed and PVA'd also. You'll use two coats.
Wax the sides and ends of your box and PVA the seperate pieces, one coat should be enough. Assemble the box around the mold base, try to avoid scraping the PVA off. Use masking tape on the out side to seal the edges and bottom, you don't want the mold material leaking.
Now mix up your mold material. I use a product called F.C.C. ( Foundation Casting Compound ) from Pilgram Permocoat, located in Tampa, Fl. Cost, about $54 for 1 1/2 gal kit. One problem is that they don't ship it out because of the hazardous duties. There are other compounds that should work. The characteristics to look for are: 1. Low exothermic reaction 2. High compressive yield ( better than 9,000 psi ) 3. Low shrinkage ( F.C.C. is 0.0003997 in./in. ) 4. Tensile strength better than 4,000 psi.
After you've mixed the resin, let sit for 30 min. to start reaction, let the bubbles settle out, and allow the heavy parts sink to the bottom.